Redesigning a museum website is an exciting and engaging process. Reorganization and restructuring the information architecture is as satisfying as finally cleaning out and reorganizing the garage. For Cuberis, the next stage is browser-based prototyping which presents the new site’s content, structure, and functionality in a clickable working website prototype. Of course the big reveal of presenting the new visual redesigns is the apex of the process. And finally, the new design mockups come to life during our Beta phase, where we transform the prototype into the final site, mirroring the approved design.
But before the site can go live, there is that pesky detail of moving in all the site content. Suddenly the excitement drains away as the client is faced with the extensive and sometimes tedious work of content population.
No matter how you slice it, content migration is a chore. At a certain level, you just have to roll up your sleeves and work your way through lots of posts and pages, downloading and uploading images and documents, relinking them, and often rewriting and reformatting text.
You might think that in today’s database-driven content management system world you could just export and import all the content. This might be possible, to some degree, for some content types (collection objects, for example). In practice there are going to be so many differences between the old and new sites that every page will need to be reevaluated and revised to one degree or another. Internal links will need to be updated. Images and documents will have new URLs and need to be relinked throughout.
And that’s just for pages whose content is going to carry over essentially as is, which is not likely to be the case for much of your content.
While we can’t eliminate the need for elbow grease, this guide will help you organize the process, and provide some tips that can help you speed things along.
Initial Page Inventory
Our redesign process begins with a complete website page inventory of the original site. While we include every archival blog post, past exhibition, or events (we do itemize them), all other content is listed and cataloged. Museum websites often contain well over a hundred non-serialized pages. Our inventory is the starting point for reorganizing a new and improved navigation system.
As we take inventory, we ask clients if any of the existing pages or sections will be eliminated from the new site. We also ask about any new content that will be added. This helps us to refine the initial inventory and flesh it out so that it approximates what the new site will contain.
As we inventory and restructure, we also consider pages that could be reduced and combined into one new page. Older websites get bogged down with extra pages over time due to the inflexibility of older platforms. A lack of content options such as accordions and tabs also leads to the unnecessary multiplication of pages. The process of taking inventory and revising helps clean up a sprawling site into a more consolidated and simpier user interface.
Tools of the Trade
We use AirTable to build our page inventories. AirTable is a cross between an Excel spreadsheet and a FileMaker Pro relational database. It allows us to sort and filter the inventory and represent a primitive new navigation system using their built-in tools and custom views.
AirTable is a bit more advanced than a spreadsheet, so it can take some getting used to. But we invite our clients to use our AirTable inventory in the later stages of the process to help manage the content creation and migration process.
Where to Start with Content Migration
It may seem counter intuitive, but starting content migration from the top down (beginning with the home page and main landing pages) is not the best approach. It’s better to take a bottom up approach. Start with the deep wells of content, your archive of blog posts, past exhibitions, resources, and events.
Content Relationships Require a Bottom Up Approach
A modern museum website can be greatly enriched by including related content wherever context permits. When you create exhibition pages, it’s ideal to link to blog posts or events related to the exhibition. If you are creating educator resources, link them to exhibitions and posts related to your topic. If you’re writing a blog post, leave your reader with a set of links to exhibitions and resources to continue their exploration.
Related content is a powerful capability, but it also creates real challenges to the content migration process. When you’re working on an exhibition page, for example, and you want to add related blog posts, technically you can’t do that until that content exists. If you haven’t migrated all your blog posts, how are you going to link to them from the exhibition pages? Or, if you start with blog posts and you want to augment them with related exhibitions, you’ll have the same problem in reverse.
Cross linking within a site creates similar catch 22s. If you are working on the “Plan Your Visit” page and it links to a “School Tours” page, but you haven’t added that page yet, how can you set the link?
“Content creation and migration is not a simple linear process.”
That’s why content creation and migration is not a simple linear process. It requires multiple passes throughout the process—returning to pages that have had their initial content added, but need internal links and related content updated after that content has been added.
This is part of why we like AirTable in managing the process. It allows for multiple independent views and filters to be applied to all the records. So, for example, you could add a content status field and add any number of status conditions: “needs links,” “needs related content,” “needs SEO optimization,” “ready for review,” “complete,” “approved,” and so forth.
You can then create unique views for each team member with pre-set filters based on their status. So for example, a copy editor’s view can be filtered to only show those pages that have been marked “ready for review.” When they’re done reviewing they can change the status to “ready for approval,” which would remove it from their view and add it to another team member’s view for final approval.
Since every site is unique, and every team is organized differently, AirTable provides a nice balance between flexibility and functionality to help manage this multifaceted, multi-person, multi-page process.
Starting with “Serialized Content”
Since building content relationships is so important to a museum website you should begin from the bottom up, moving your blog posts, past exhibitions, resources, and past events (especially if events are related to exhibition pages).
Among the types of content that it may be possible to import, blog posts are usually the most exportable and importable—especially if you are moving from one WordPress site to another. But even if you can import your posts, you will still need to review every post. In many cases embedded images may need to be updated, internal links will almost certainly need to change, PDFs or other documents that will need to be re-uploaded and linked, content styling may need to be reapplied or reconsidered, and new categories applied.
If importing is possible, you should certainly do that, even knowing there will still be a lot to review. When you import all your posts, then they will at least all exist (for cross linking purposes) as you work on relating them to other pages and posts.
If you don’t have a built-in way to import posts, you get halfway there by creating a simple spreadsheet that includes just the title, author, and published date for all your posts. We can export a CSV from your spreadsheet and perform a custom import so that all the posts will exist for cross linking purposes, even if they still need to have their content moved.
Our prototyping process usually includes a content strategy around organizing your posts, resources, and other serialized content. So if you do import your posts, don’t include all the old categories. You’ll want to reconsider how your old posts will be reclassified under the new category system.
Replacing Images and Files
When migrating your blog (or any page for that matter) one of the steps is replacing the images with ones uploaded to your new site’s media library. When I do this work I like to download all the images on a page at one time. The easiest way to do this is to go to the live site and right mouse click (or hold down Control “Ctrl” on the Mac) and select “Save Image As” and download it to your local computer. Repeat this for every image.
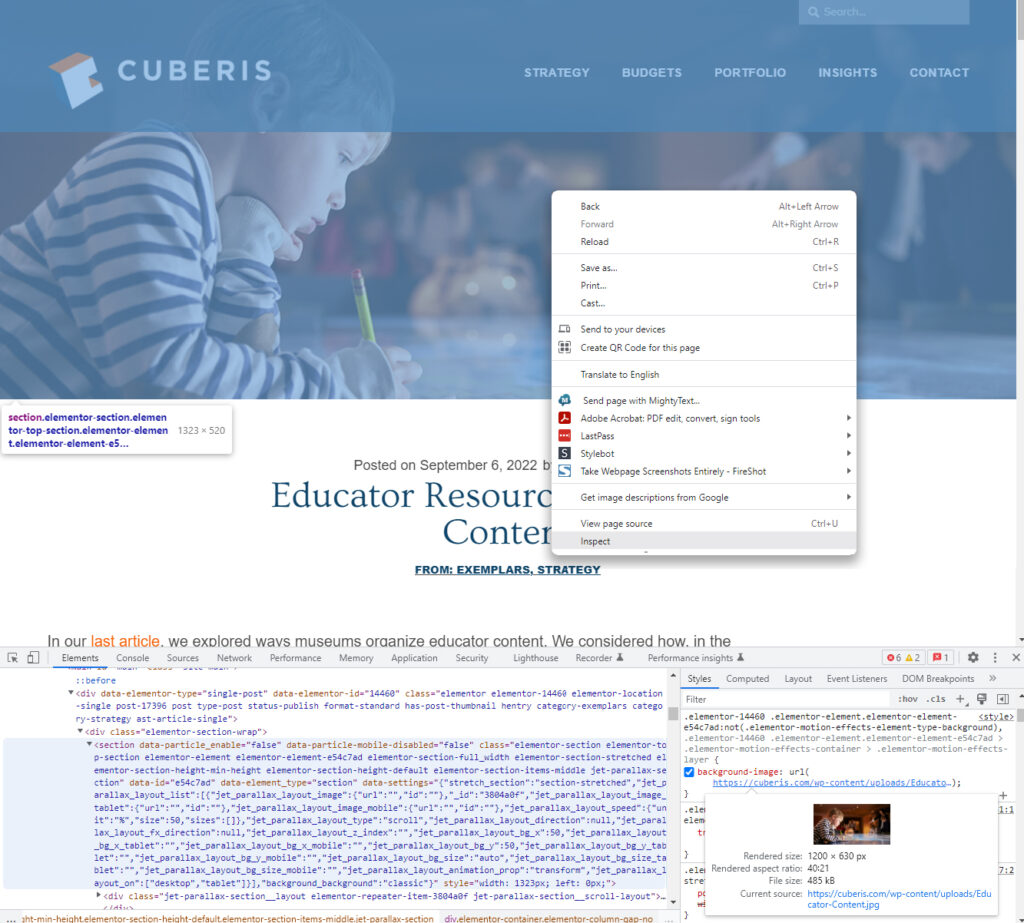
Sometimes the right mouse click won’t give you the option to download the image. For example, this occurs when images are set as backgrounds. There is still a way to get these images, but it’s a little more complicated. You’ll need to use your browser’s inspector.
When you mouse over any object on a webpage and right click (or Ctrl), you’ll see an option for “inspect.” This allows you to explore the underlying HTML and CSS of the page. If an image is set as a background you may need to explore a bit up and down the levels in the revealed code until you see the image linked in the CSS panel. Once you find it, you can click the link in the inspector window and it will open the image in a new tab. From there, you can download using the right mouse click method.
Using the inspector is also helpful in finding an image’s file name. And you’ll often need that in order to find a previously uploaded image in your media library. Images are sometimes named in obscure ways, so you don’t know what to search for. If you go to the instance of that image on the live site you can inspect it to find the file name, and then search for it among your uploaded images.
Importing Images
Once you’ve downloaded all your images, you need to upload them to the WordPress Media Library. WordPress allows you to batch upload them all at once.
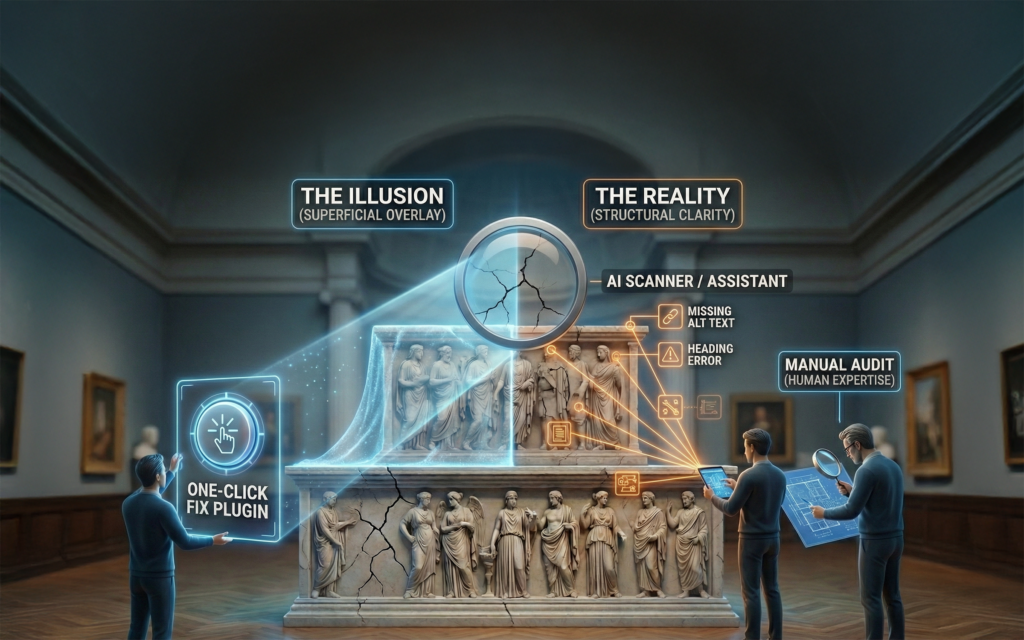
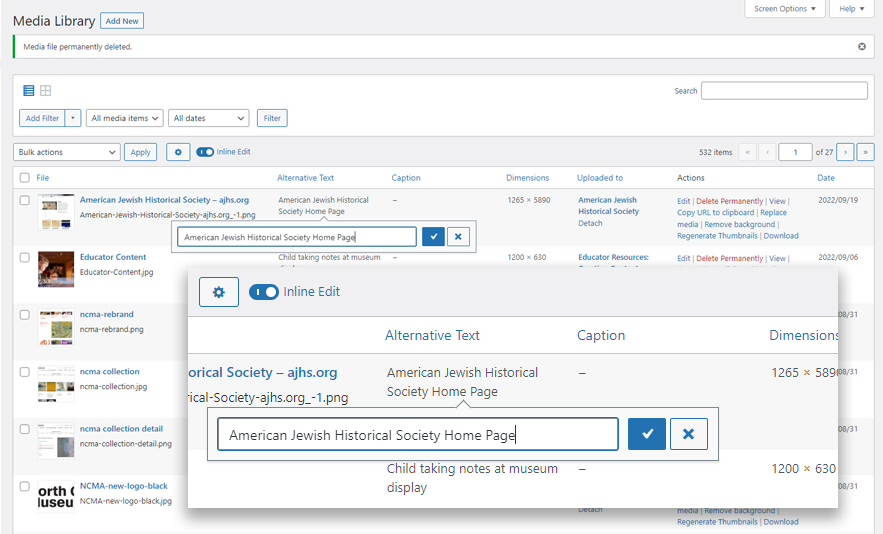
When uploading images, you should take the time to add “Alt text” to every image. This is necessary for your site to be accessible. It’s often overlooked. So it’s good practice to add Alt text before you add them to your pages.
We generally install Advanced Columns Pro on our sites and customize the media center view (when viewed in list mode) to show the Alt Text field and other help info. Advanced Columns Pro also has an inline edit field, so toggling that on allows you to add your Alt text right there in the list view without having to open the details screen for all the images.
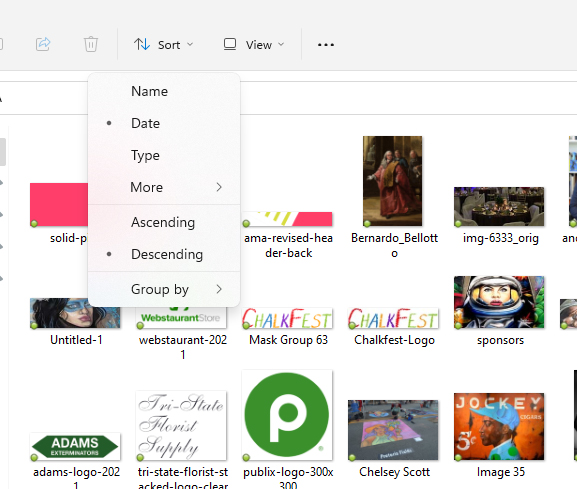
Pro Tip: As you work through all your content, downloading many images to your local computer, your folder of downloaded images will grow quickly. If you set the sort order of your folder or directory to Date/Descending then the images you’ve most recently downloaded will be first in the list, making them easy to identify and select from all the others.
Other Image Issues
When you are reusing images, you may find that the original images are too low resolution for the new site. (Large images are less of an issue since WordPress automatically creates multiple thumbnails at different sizes whenever you upload them.) But if an image is too small and you upload and display it in a larger context, the image will be blurry. You’ll need to find the original source and save a larger version, or replace it with a new image at a higher resolution.
There are other issues with reusing images, or adding images to a new site where the layout changes the ratio of the image’s presentation. We’ve written an article all about displaying images in various formats and contents called, Squashing Art Into Tiny Boxes.
Downloading Other Page Resources
After finishing all your images, download any other files linked in the content. One quick way to find these, especially if there are many links on a page, is to use your Tab key to move the focus from link to link. As you do this you’ll see the URL of each link displayed in the lower left corner of your browser window. This will quickly reveal which links are internal cross links, which ones go to PDFs or other docs, and which are external links which may not need to be updated (other than perhaps setting them to open in another tab).
TIP: If you have to relink a bunch of external links, or email links, you can right mouse click on the original link, and select “Copy link address.” That will copy the URL to the clipboard and you can then easily add it to the new content.
Linking PDFs and Other Documents
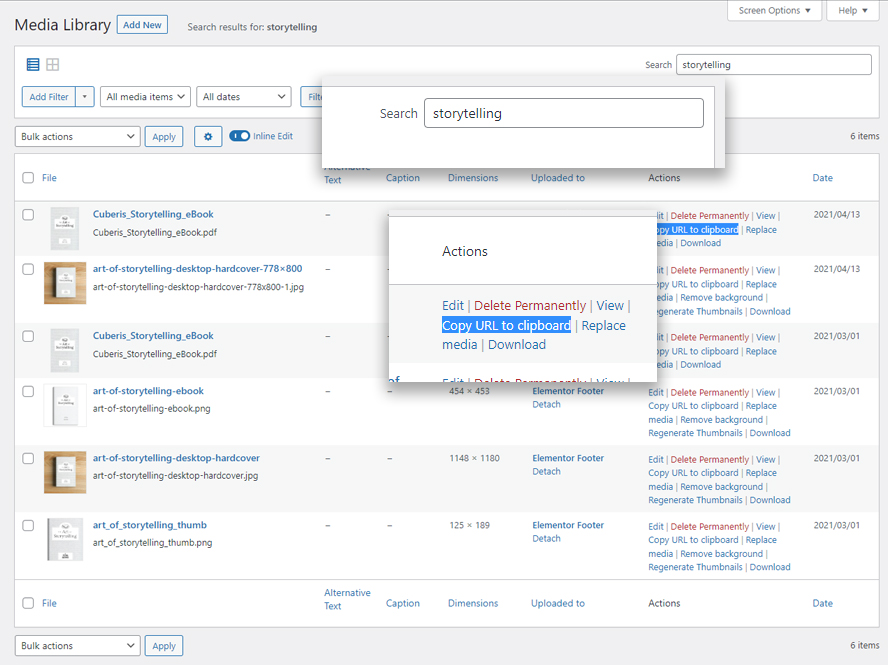
Making links within our framework is facilitated by a helpful search feature, which allows you to dynamically search for the pages you want to link to. Unfortunately you can’t search for uploaded documents this way. So, in order to create a link for a PDF, you’ll need the full media URL of the document. You can find that in the Media Library.
First, make sure you know at least part of the document’s file name. You can find this by simply hovering over the link to the file on the old site (you’ll see the URL including the file name at the end in the lower left of your browser). Then, go to the WordPress Media Library and use the search bar to find the file. You’ll see an option in the Actions of the file to “Copy URL to clipboard.” This will give you the full URL that you can paste into the link settings on your page. (For documents, when you add the link, it’s typically best practice to also set the link to open in a new tab.)
Updating Cross Links
As already mentioned, updating cross links can create snags if you haven’t imported all the posts at once. Since many posts reference each other, you’ll need to come back to that post later to set those links after you’ve created the referenced posts. Using AirTable or another spreadsheet to keep track of all these details helps manage the fluidity of this process.
The Copy Paste Styling Trap
One of the most common mistakes our clients make when manually moving text from the old site to the new one is simply copying and pasting the text into the text editor on the new site. Unfortunately, when this happens it is possible for all of the embedded styling to get included in the copy paste process. This styling usually overrides the site wide typographic and color settings we apply.
Instead we train our clients to copy text using a “Copy as Plain Text” browser extension, or to paste copied text into an unstyled text editor, and then paste it into their new site’s text editor. This removes all styling, and pastes clean text. Of course this means you need to re-apply styling to the pasted text (bold, italics, heading levels, bullets etc.). While this is tedious, it’s worth doing by hand, because often the new designs have options that were not available on the old platform, and the typographic standards will almost certainly change. So redoing styling provides the opportunity to consider the best way to present the information in the context of the new design.
NOTE: for Cuberis clients. When we build your prototype we often break this rule and copy and paste content from your current site into our early stage prototypes—embedded styling, images, and all. We do this in order to show as many real word content examples in the prototype as possible. Since the prototype gets transformed into your final website, much of this early content will still be there when you work on final content. So be sure to either carefully clean up any content that’s already in place at the start, or just delete what’s there, and do a fresh copy and paste.
SEO Optimization
The last thing to do when migrating a page or post is to update its SEO information. Every page will have a section in the WordPress editor where you can access Yoast SEO settings. While there are many things that you could potentially do to optimize each page, the most important thing you can do is simply optimize the SEO title and SEO description. Review this article for details on how to optimize these fields.
Other Serialized Content
In addition to blog posts, museum websites also have serialized exhibition pages. Exhibition pages tend to be more robust than the typical blog post, involving many more images, related events, and other content. So when you finish migrating your blog posts, with all that content fresh in mind, working through your exhibitions is a good next step—augmenting them with related posts. (And then perhaps revisiting the posts, adding the related exhibitions.)
Additionally, your exhibitions may list old events. Even though those events are past, this may still be relevant archival information. This is another chicken and egg dynamic. You’ll need to go back and add all the old events in order to relate them to your exhibitions. The same goes for other resources such as gallery guides, teacher resources, and lesson plans related to exhibitions.
Anchor Links
As mentioned earlier, some of your old pages may be consolidated into one new page. For example, maybe you’ve included directions on the new “Plan Your Visit” page, when the old site had them as two separate pages. It can be helpful to drop an “anchor” into the content just above the directions on the new “Plan Your Visit” page. (Our site training videos cover how to do this.) By adding these anchors, you can create special links that not only go to the visit page, but also anchor down to the directions section lower on the page.
Getting Ready for Launch
Once your content migration is complete, and you’re ready for launch, the last step is testing. Testing involves a comprehensive review of the entire site. Testers review everything from how the site looks in different browsers and on different devices, to checking links, and scanning for any remaining copy editing errors. We provide a testing checklist that will guide testers through the process and help them find and report any issues.
We install a tool called UserSnap which adds a temporary button to the lower right part of the browser window allowing testers to easily create screengrabs of any anomalies and add their comments. These bugs are collected in Usersnap where we can assign and quickly fix anything that gets reported.
It’s extremely important however, that you recruit testers that have not been a part of the design or content migration process. Both your team and ours will be experiencing “site blindness” by the end of this long process and it’s far too easy for us to overlook mistakes.
Setting Up 301 Redirects
The very last step before launch is to build a list of 301 redirects. Since all the old site pages will now have new URLs, reflecting the new information architecture, if we don’t build an index that maps the old URLs to the new ones, external links will all end up on the new site’s 404 “page not found” error page.
This is especially problematic for your search engine placement. Without a 301 redirect index, your search engine status will be lost. By setting up this official index, not only will old links redirect to their proper corresponding new pages, but Google and other search engines will assign each old page’s history and status to the corresponding new pages.
We use our initial page inventory to build out most of your 301 index. However, since the overall design and development process can span many months, our initial inventory will lack any pages that will have been created since the beginning of the project. You will need to itemize these interim pages and let us know which new pages these correspond to, so we can add them to the final 301 redirect index.
Content Migration Checklist
Content migration is a big job and it’s a complex job. Here is a checklist you can use as you work through each page in order to keep track of your overall progress. (Before beginning, build lists of serialized content – blog posts, resources, exhibitions, events, etc. in a spreadsheet for a one time page/post creation.)
- Copy basic text from source and paste onto new post or page (without styling).
- Redo styling (bold, links, heading level, blockquotes, etc.)
- Download images (and other documents) from the original site.
- Batch upload images and documents for your page.
- Update your image’s alt tags in the media library.
- Add the images to the page (select the best thumbnail size based on layout and context).
- If you need a new image for the page, add a flag to your spreadsheet or AirTable.
- Update links to documents.
- Update internal links (if new pages do not exist yet, flag the page in your spreadsheet or AirTable).
- If the page is a post or resource, recategorize based on your new content strategy.
- Optimize Yoast SEO page title and description.
- If your page does not need other resources, and is ready for review or approval, update the status in your spreadsheet or AirTable accordingly.